How to do it
Before you begin putting in some content, if you have any doubt, just ask. You can’t do any harm to the website by making errors.
If you delete something by accident, it’s never lost forever. Be sure to save your draft or publish it regularly to avoid losing your work.
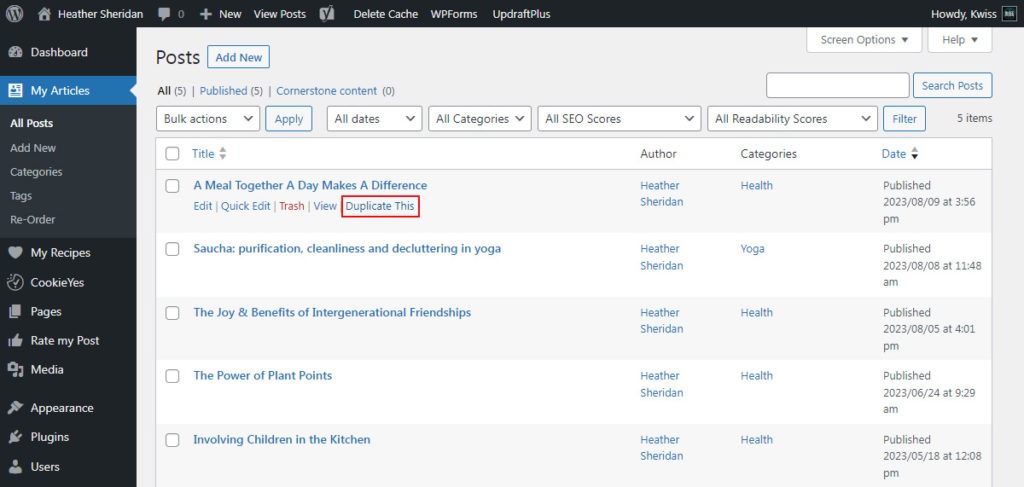
1. Go to My Articles (highlighted in red) at the top of the left column.
2. Once on the Blog Articles page with the list of all your articles, the easiest way to put in some content is to duplicate an existing article. Be sure to duplicate an article of the same category (Health, Yoga or Mindfulness … which you can detect in the Categories column in the list of articles) to have the proper category color (purple, orange or green) on your article and have the right category in the filters in the Articles page.
To duplicate an article, hover on the article you want to duplicate and click on Duplicate This (highlighted in red).
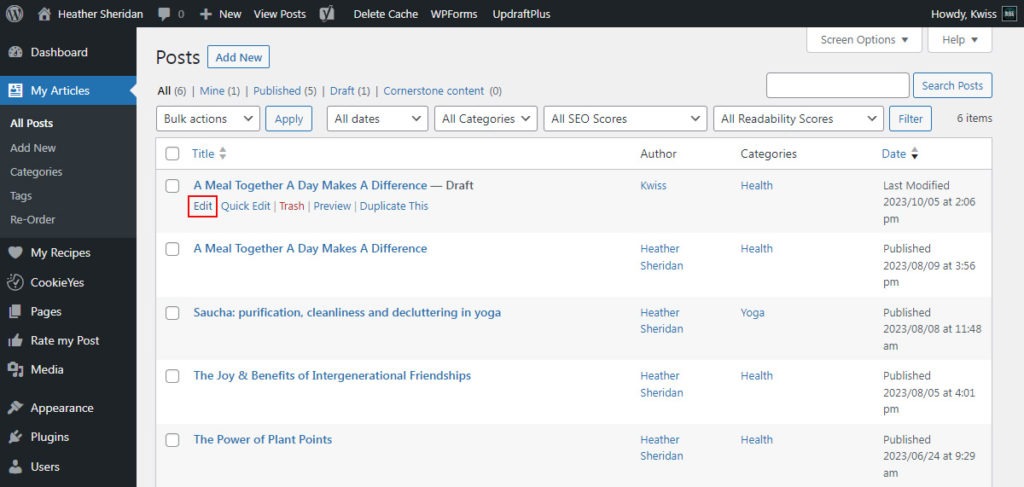
3. It will create a new article with the same content and specificities as the original. The only difference is that it is set to Draft (next to the title). Draft means that only you can see the article for the moment. It will only be available in the list of articles on the website once you’re happy with it and publish it (as explained later).
To apply your new content, hover on the article, click on Edit (highlighted in red) or click on the title of the articles. As you can see, there are other options that you can use. Quick Edit is a short way to edit some properties on the page. Trash means it’s put in the bin (that remains full unless you empty it so nothing is lost and can be restored in the bin). Preview is to preview the page.
4. Once on the draft article, before putting in your content. Here’s a recap of the settings and tools (highlighted in red) you’ll need to check. It looks like a lot but once you’ve used them a couple of times, it’ll be a walk in the park. All the other items you don’t need to care about.
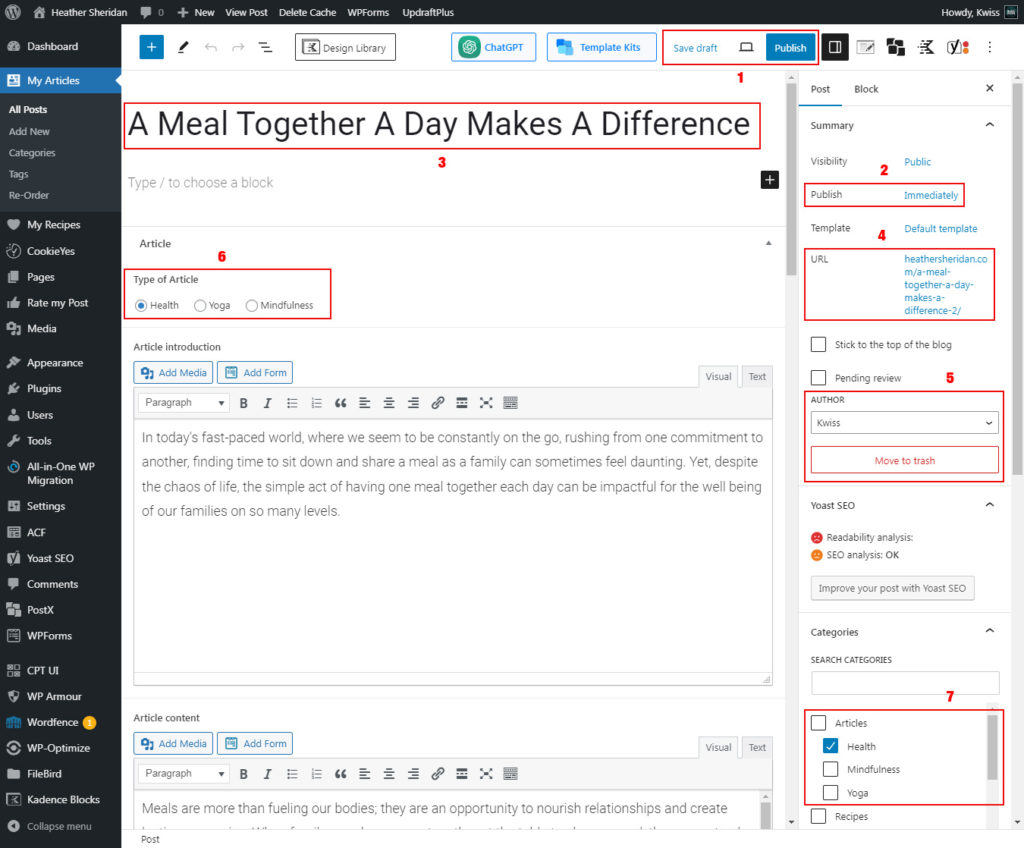
- That little menu allows you to save draft (save your work as a draft until you want to publish it), preview the article (the little screen icon) or publish it (once you click on that, it will be added to the website and the previews will be created in the latest articles on the Homepage and on the Articles page).
- Before publishing your page, you can choose to publish it immediately (meaning it will take the publishing date and will put it first in the list) or modify the publishing date in the future (if you want to publish the article automatically two weeks later) or in the past (if you want the article to be placed lower in the list, as the list is ordered by publishing date).
- Put in the title of your article.
- Once you’ve put in your title, the url (the address of the page) should reflect it (heathersheridan.com/the-title-of-my-new-article). Normally, you won’t have to change it as it is automatically updated, except in you wish to have a specific link name (heathersheridan.com/my-specific-title).
- As you’ll be the main author, your name will be selected by default. You can also trash the article if you want. Again, it’ll go in the bin an can be restored.
- This is where you choose the type of article (Health, Yoga or Mindfulness). If you duplicated an existing article with this category, you don’t need to update the check boxes. If you want to change the category, you can do so but you will also need to do the same in the setting number 7.
- If you need to change the category, change it here as well. It will put the recipe in the proper category for the filters Articles page. It will also apply the proper color scheme depending on the category. Focus only on the Articles check boxes (not the recipe ones) and check only one category per article. I can add more categories if needed so let me know when it’ll be the case.
5. These are the areas where you will insert the content related to your article. Before copying/pasting your content in the areas described below. be sure to copy your content from a styles-free software. MS Word and Pages add markers to the text in their files (you don’t see them when you paste the text, but it’s there). To be sure, if you click on the Text button you should see the exact same thing, without any markers around your text). To avoid any issues, use softwares like TextEdit (on Mac) or Notepad (PC). Normally, your computer should have one by default.
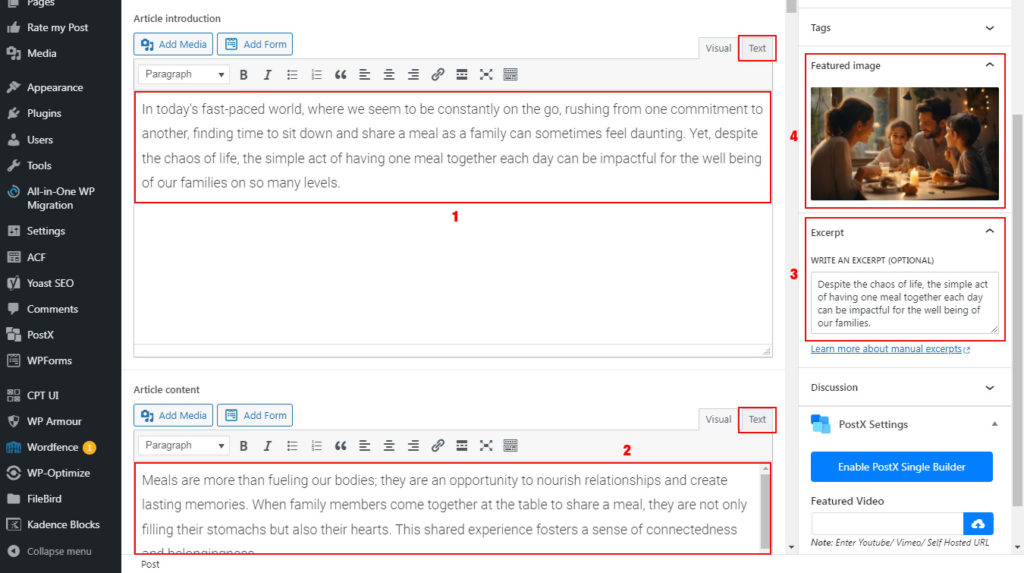
- The introduction to the article (the text appearing in bold): try to keep it as one paragraph and without any styling (bold, italic, …)
- The content of your article: it works as any text editor. You can add styles (bold, italic, links, lists, …) with the tools above the text field.
- The exerpt of your article: the short and sweet description of the article that will appear in the preview on the Homepage and the Articles page. Try to keep a balanced amount of text in your articles (and recipes) so that it looks homogeneous.
- This is where you set the image related to the article. Normally, I will be in charge of that side. When you think your draft is final, let me know and I’ll generate the image and put it in. I’ll let you know when it’s done and can decide when to publish the page (as described in point 4.1.).
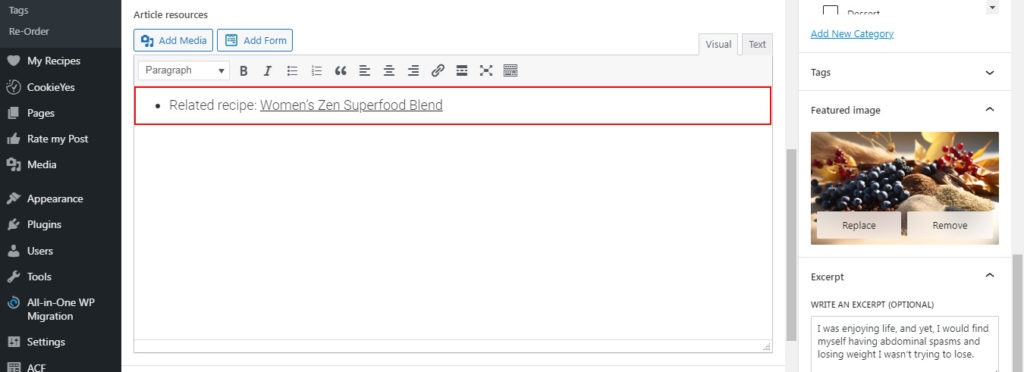
6. You can add any additional resources as illustrated on that article (/the-power-of-plant-points/). If you don’t put anything there, nothing will show. If you need something there, go to the page mentioned previously, copy the content in that field and paste it in your new article. Then adapt it with your new content (text and links, internal or external). If you put an external link, be sure to select ‘Open in a new tab’ in the link options (when the link is selected, there’s a button to access the options).
On that article (/saucha-purification-cleanliness-and-decluttering-in-yoga/), you can see that there are different styles used (titles, lists and numbered lists, …). They are all available in the tools above every text field. Copy your content in and click on the options to style it. It can be a little tricky to use but you can also copy the paragraphs with the styles you want in pages that use them and paste them in your new article. I can always have a look when you’re finished to fix any issue.
7. Once all that is done. I will generate the image and will ask you if the image is ok for you. If so, I’ll put it in and add all the information concerning the referencing options for Google and social media (sharing image and content, …). Once that is done, either you publish the article or give me the go to publish it. It takes 1 minute so feel free to ask.
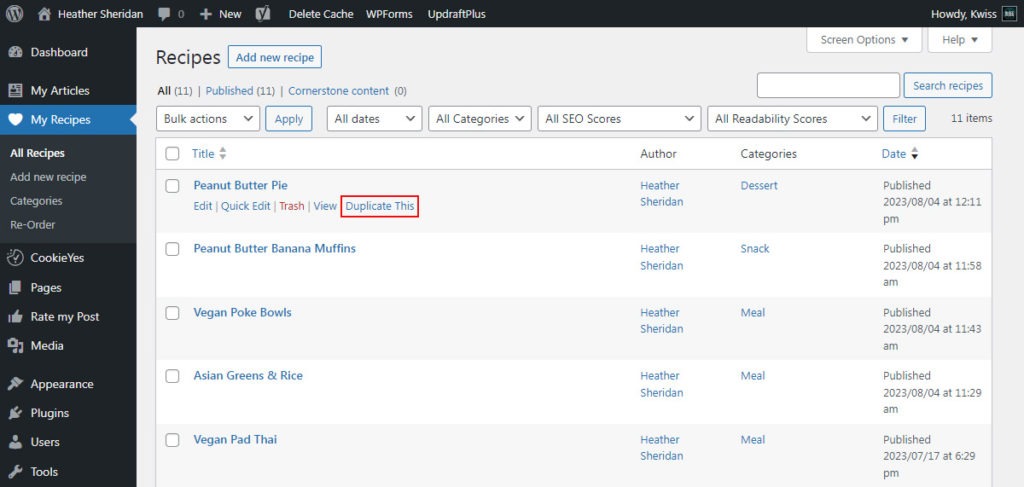
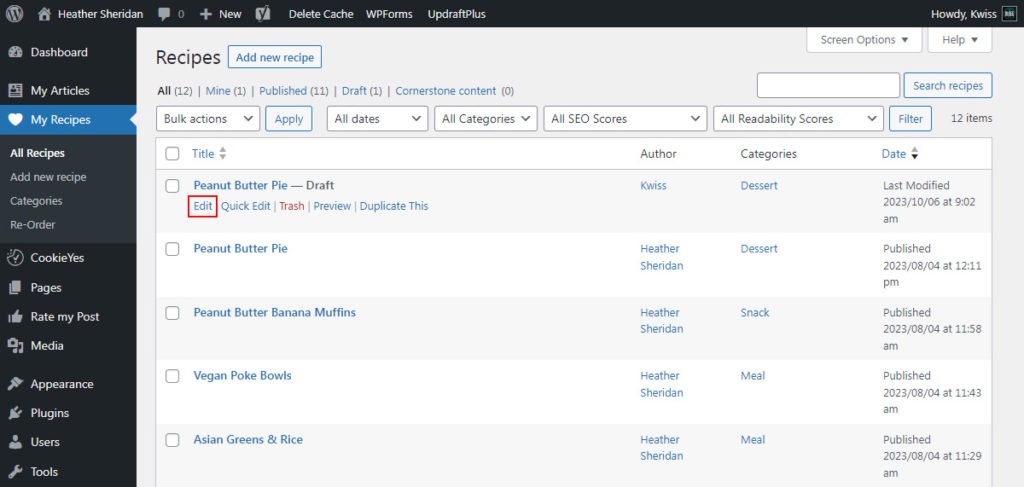
1. Go to My Recipes (highlighted in red) at the top of the left column.
2. Once on the Recipes page with the list of all your recipes, the easiest way to put in some content is to duplicate an existing recipe. Be sure to duplicate a recipe of the same category (Meal, Dessert, Snack or Other … which you can detect in the Categories column in the list of recipes) to have the right category in the filters in the Recipes page.
To duplicate a recipe, hover on the recipe you want to duplicate and click on Duplicate This (highlighted in red).
3. It will create a new recipe with the same content and specificities as the original. The only difference is that it is set to Draft (next to the title). Draft means that only you can see the recipe for the moment. It will only be available in the list of recipes on the website once you’re happy with it and publish it (as explained later).
To apply your new content, hover on the recipe, click on Edit (highlighted in red) or click on the title of the recipes. As you can see, there are other options that you can use. Quick Edit is a short way to edit some properties on the page. Trash means it’s put in the bin (that remains full unless you empty it so nothing is lost and can be restored in the bin). Preview is to preview the page.
4. Once on the draft recipe, before putting in your content. Here’s a recap of the settings and tools (highlighted in red) you’ll need to check. It looks like a lot but once you’ve used them a couple of times, it’ll be a walk in the park. All the other items you don’t need to care about.
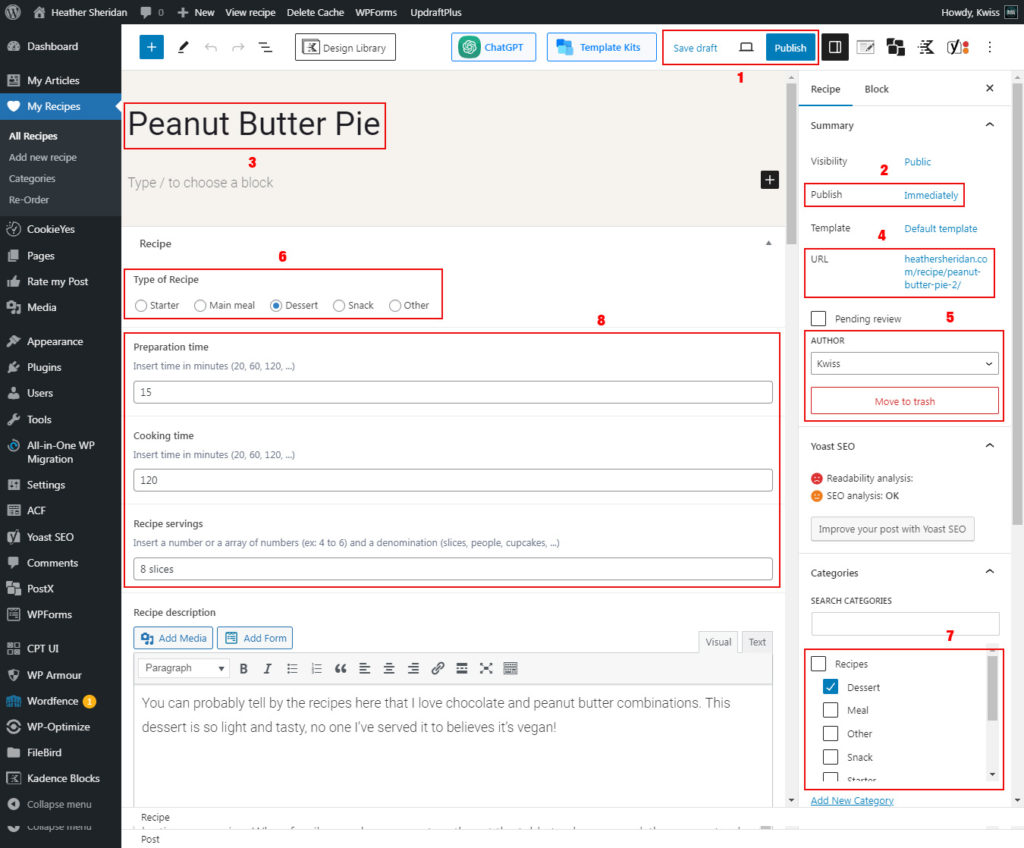
- That little menu allows you to save draft (save your work as a draft until you want to publish it), preview the recipe (the little screen icon) or publish it (once you click on that, it will be added to the website and the previews will be created in the latest recipes on the Homepage and on the Recipes page).
- Before publishing your page, you can choose to publish it immediately (meaning it will take the publishing date and will put it first in the list) or modify the publishing date in the future (if you want to publish the recipe automatically two weeks later) or in the past (if you want the recipe to be placed lower in the list, as the list is ordered by publishing date).
- Put in the title of your recipe.
- Once you’ve put in your title, the url (the address of the page) should reflect it (heathersheridan.com/the-title-of-my-new-recipe). Normally, you won’t have to change it as it is automatically updated, except in you wish to have a specific link name (heathersheridan.com/my-specific-title).
- As you’ll be the main author, your name will be selected by default. You can also trash the recipe if you want. Again, it’ll go in the bin an can be restored.
- This is where you choose the type of recipe (Meal, Dessert, Snack or Other). If you duplicated an existing recipe with this category, you don’t need to update the check boxes. If you want to change the category, you can do so but you will also need to do the same in the setting number 7.
- If you need to change the category, change it here as well. It will put the recipe in the proper category for the filters Recipes page. Focus only on the Recipes check boxes (not the article ones) and check only one category per recipe. I can add more categories if needed so let me know when it’ll be the case.
- These are the fields where you put in the preparation and cooking times (in minutes) and servings (as described above the text field).
5. These are the areas where you will insert the content related to your recipes. Before copying/pasting your content in the areas described below. be sure to copy your content from a styles-free software. MS Word and Pages add markers to the text in their files (you don’t see them when you paste the text, but it’s there). To be sure, if you click on the Text button you should see the exact same thing, without any markers around your text). To avoid any issues, use softwares like TextEdit (on Mac) or Notepad (PC). Normally, your computer should have one by default.
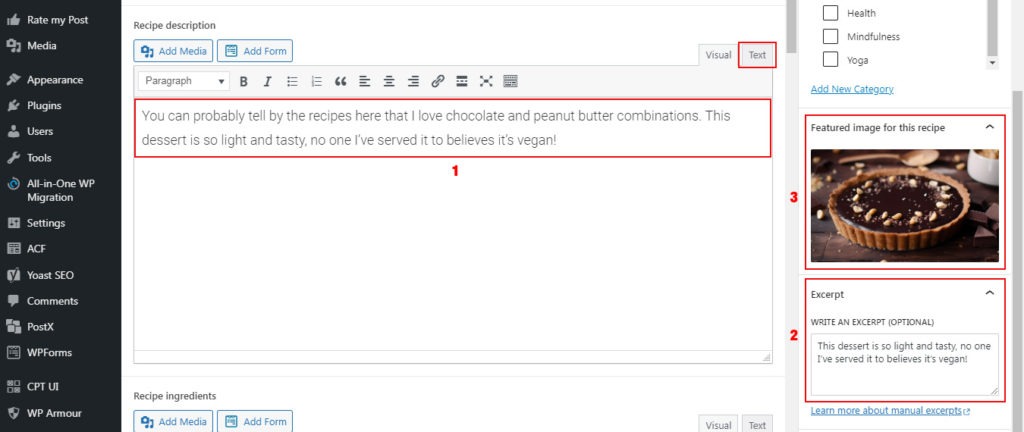
- The introduction to the recipe (the text appearing in bold): try to keep it as one paragraph and without any styling (bold, italic, …)
- The exerpt of your recipe: the short and sweet description of the recipe that will appear in the preview on the Homepage and the Recipes page. Try to keep a balanced amount of text in your recipes (and articles) so that it looks homogeneous.
- This is where you set the image related to the recipe. Normally, I will be in charge of that side. When you think your draft is final, let me know and I’ll generate the image and put it in. I’ll let you know when it’s done and can decide when to publish the page (as described in point 4.1.).

- The ingredients of the recipe: you can either paste your raw content in the text field and apply the styles (subtitles, list, …) with the tools above the text field or copy a style you like in another recipe and paste it in your new content. Subtiltes (Pie crust, Pie filling in the above example) are optional. Use them if needed but try to keep the content as an homogeneous list.
- The instructions of your recipe: same principle as the text field above. Try to always use the numbered list with the tools above the text field or by copying your raw list in the content area.
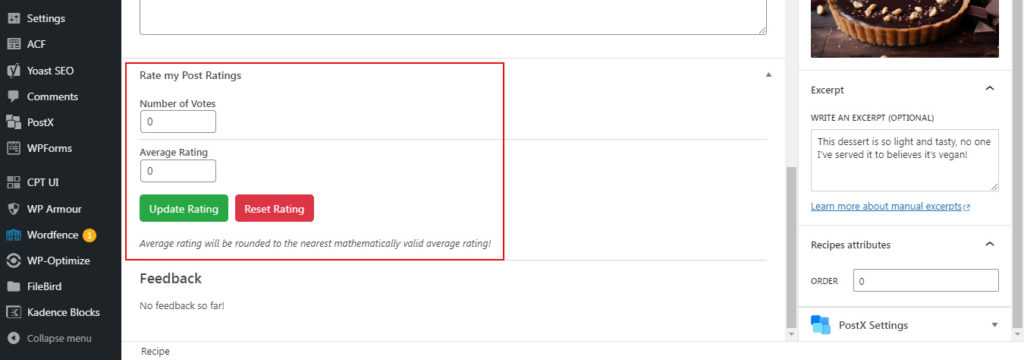
6. Somewhere down the page, you will find all the information related to the ratings of the recipes. Every time someone votes on the recipe, the number will rise and the average will be calculated. You can manually update the numbers (the vote is anonymous so you can boast your numbers for appeal value, everybody does it) or reset the values to 0.
7. Once all that is done. I will generate the image and will ask you if the image is ok for you. If so, I’ll put it in and add all the information concerning the referencing options for Google and social media (sharing image and content, …). Once that is done, either you publish the recipe or give me the go to publish it. It takes 1 minute so feel free to ask.
1. Normally, you shouldn’t wander away from the elements described above. You’ve got everything to put in your articles and recipes but if you wish to edit some content in the other pages of the website (Homepage, About, …), let me know and I’ll to the changes or will teach you how to do it if you want to. Again, it takes me minutes to do the changes so don’t hesitate to ask.
2. Normally, you shouldn’t break anything if you make an error somewhere or delete something. If you don’t know how to recover from such an event, let me know. There is a daily backup of the site so, no worries.
3. I’m always open to changes and updates so whenever you have something in mind (new pages, new categories, …), don’t hesitate to shoot.